Terragen RPC: Time of Day Example Script
Terragen RPC: Time of Day
Overview[edit]
Terragen 4.6.30 Professional introduces a new feature for remote procedure calling, or RPC. With a running instance of Terragen acting as a server, other programs can make remote procedure calls to query and modify a Terragen project.
The goal of this tutorial is to walk you through a step-by-step procedure using the Python programming language to create a script that changes the time of day in a Terragen project; in other words, provide the ability to modify a Sunlight node’s heading and elevation parameters outside of the Terragen program.
Contents
Part 01: Set up[edit]
For this tutorial you’ll first need to download and install Terragen 4.6.30 Professional as well as the Python programming language source code and installers. Once you’ve installed the new build of Terragen be sure to launch it.
- LINK to Terragen 4.6.x
- Python source code
On a Windows computer you can verify that Python is installed by querying the operating system via the Command Prompt window.
Type “command prompt” or “cmd” in the Windows search box and press “enter” to open the Command Prompt window. Type “python” on the command line of the Command Prompt window, and press “enter”. If installed, the version of Python will be displayed.
Next, create a folder for this project that is accessible to your computer network. We’ll be saving and executing the python script from this location, as well as other files and resources.
This project uses the Python script “sunpos.py” created by John Clark Craig to calculate the sun’s heading and elevation values based on the time of day and a given location. You’ll need to download the script and save it in your project folder.
Download the “sunpos.py” script and save it in your project folder as sunpos.py.
https://levelup.gitconnected.com/python-sun-position-for-solar-energy-and-research-7a4ead801777
Part 02: Coding the basic functionality[edit]
In this section our goal is to simply pass the minimum requirements needed by the sunpos.py in order for it to calculate the sun’s heading and elevation; then pass along these results to the default Sun node in Terragen.
We’ll use Python’s Integrated Development and Learning Environment, or IDLE, to write the code for our script.
Type “IDLE” in the Windows search box and press “enter” to open the IDLE Shell window.
While we can type and execute python commands directly in the IDLE shell, we’ll use the built-in file editor to create our script file so we can run it multiple times as we refine it.
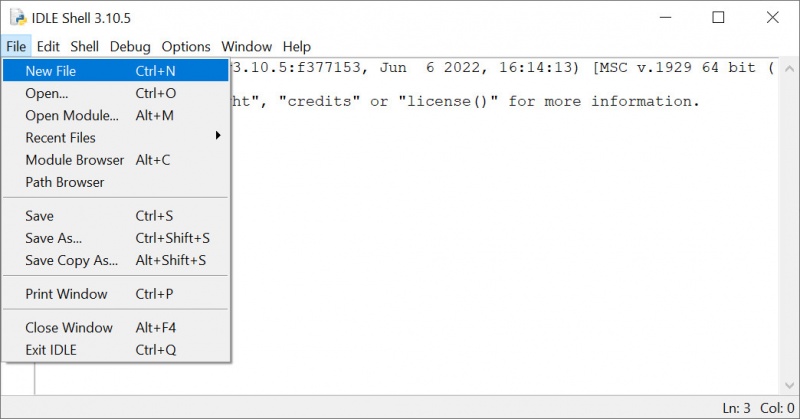
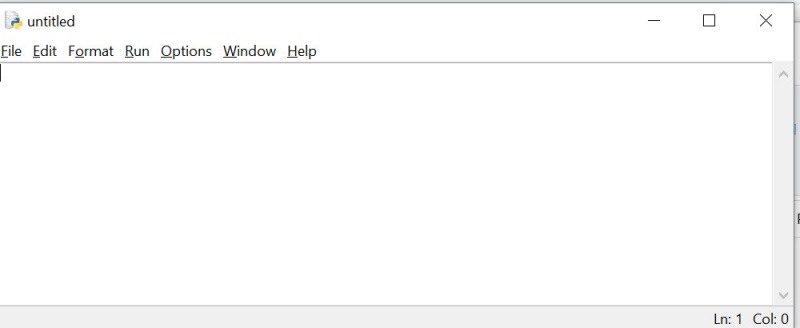
Select “New File” from the IDLE shell menu to open the file editor window.
Right now our script is completely blank, and in order for it to do something we first need to instruct Python to load certain modules or libraries when the script is run. Not surprisingly, we need to tell Python to load the Terragen RPC library and the sunpos.py script we previously downloaded. Additionally, you might need to tell Python where the Terragen RPC module was installed, as well as have the ability to query the operating system in order to access the date and time.
We’ll use the “import” keyword to insert a module into our script at run time. For some modules we’ll also use the “as” keyword to provide the module with an alias that we reference within the script.
Type the following lines of code into the file editor window. You can also copy and paste them. Note that your Terragen RPC installation path may vary.
-
import sys
sys.path.insert(0,'P:/PlanetsideSoftware/RPC/terragen_rpc-0.9.0/terragen_rpc-0.9.0')
import terragen_rpc as tg
import sunpos as sp
In order for the sunpos module to determine the sun’s heading and elevation, it needs to know a date, time, and a location. Initially we can supply this information via Python’s datetime module, so we’ll load that as well, this time using the “from” keyword instead of the “import” keyword in order to load just the portion of the module we want.
-
from datetime import datetime
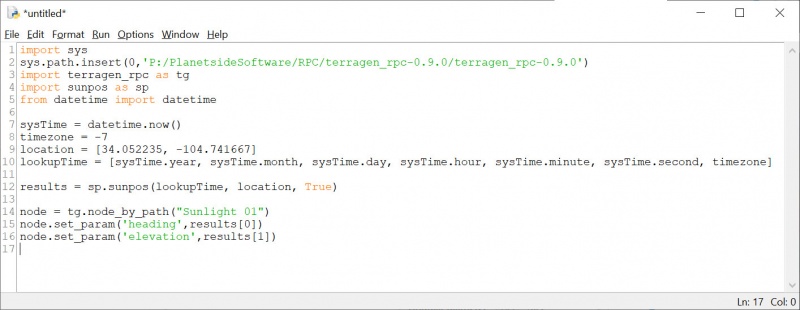
Our script should look like this:
With the library modules imported into the script, our next step is to define the values which the sunpos module requires to make its calculations. Variables are used to store information that can be referenced or manipulated within a computer program, such as text and numbers. In Python we can define the variable and its value in the same statement.
Let’s create four variables to hold this information, one for the computer system’s date and time, one for the location on Earth utilizing latitude and longitude coordinates, one for a timezone, and one last variable to format the date, time and timezone information the way that the sunpos module expects it to be.
For this example, we’ll use the timezone, latitude, and longitude for Los Angeles, CA, USA. Notice that the location variable and the lookupTime variable consist of multiple components. This is referred to as a list in Python, and is somewhat similar to an array in other programming languages.
-
sysTime = datetime.now()
timezone = -7
location = [34.052235, -104.741667]
lookupTime = [sysTime.year, sysTime.month, sysTime.day, sysTime.hour, sysTime.minute, sysTime.second, timezone]
Our script now looks like this:
Now that the variables have been defined that will be passed to the sunpos module, we can call the module and save its results. All of this can be done with one Python statement. We’ll define a new variable on the left of the equals sign called “results” to store the sun’s heading and elevation information which will be returned by the call to the sunpos module.
The statement to the right of the equals sign is the call to the sunpos module. The “sp” is the alias we defined at the start of the script to reference the sunpos module, and the “sunpos()” is the function within the module that gets run and calculates the sun’s heading and elevation. All the data needed to perform the calculations are passed to the module by listing the variables between the two parenthesis
-
results = sp.sunpos(lookupTime, location, True)
The last step is to apply the results to our Terragen project via RPC. We’ll do that by telling Terragen which item we want to act upon, the default Sun node, then setting the new values for its heading and elevation parameters.
The code below creates an instance of the item “Sunlight 01” called “node” which can be manipulated by our script. The “set_param” function then changes the heading and elevation to the values in the results[] list.
-
node = tg.node_by_path("Sunlight 01")
node.set_param('heading',results[0])
node.set_param('elevation',results[1])
Our script now looks like this:
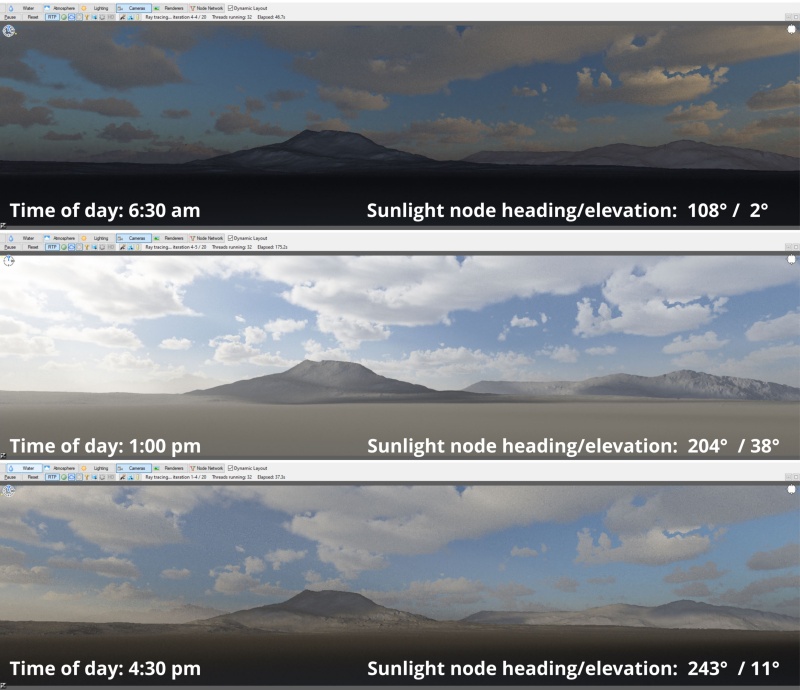
Save the script in the project folder by selecting “File Save As” from the IDLE main menu and giving the script a name. Then press “F5” or select “Run > Run Module” from the IDLE main menu to run the script. The 3D Preview window in Terragen will update to show the new direction of the sun.
Part 03: Coding a basic GUI[edit]
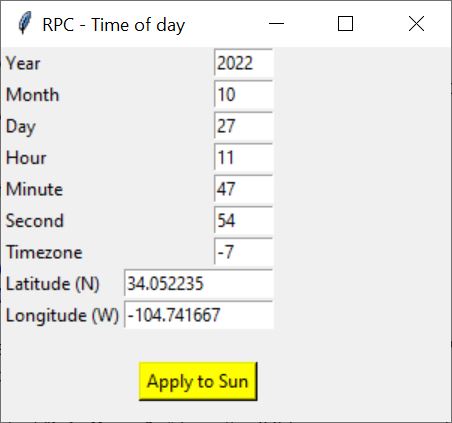
In the previous section we showed how a simple script can be created to manipulate the sun’s heading and position. In this section we’ll make the simple graphical interface, or GUI, seen below in order to manipulate the values of each variable much easier.
To build the GUI for our script we’ll take advantage of the “tk interface” package, or “tkinter”, included in Python. Note that in some cases, tkinter’s syntax may appear slightly different than the coding in the section above, for example in defining a variable.
Just as in the previous section, the first step is to import the tkinter package into our script. When creating a script that includes a GUI these are typically the first lines of code in the script. So we’ll prepend our existing script with these two lines of code.
The first line of code imports all the functions and built-in modules in the tkinter package into the script, while the second line of code imports the ttk package which is responsible for the style of the widgets (buttons, etc.)
-
From tkinter import *
From tkinter import ttk
Next we’ll build the window for the GUI, starting with its size and title. We’ll insert these lines of code after the import statements and before the variables. It’s also useful to add notes or comments in a script as well. The “#” symbol instructs Python to ignore anything in the line of code that follows it. We’ll make use of this symbol to set reminders and stay organized in our script.
In Python scripts the basic window is often defined as “root”, but for this example we’ll use the word “gui”.
In the “title” attribute we can define text to display in the windows title bar. The “geometry” attribute sets the width and height of the window in pixels.
-
gui = Tk()
gui.title("RPC - Time of day")
gui.geometry("300x250")
Whenever you make a GUI, you want to include a looping function for that window at the end of the script, which in effect causes the script to wait for user input. This will remain the last line of code in our script. Add the following line of code at the bottom of the script.
-
gui.mainloop()
Here's the script so far:
In order to individually adjust each component that makes up the date and time information, we need to define a variable for each part. We’ll create these variables using tkinter functions, such as IntVar(). These functions accept many arguments such as a window name or a value. In our script, “gui” is the window name, and the value comes from the sysTime variable’s attributes we previously defined.
Insert the lines of code below, following the sysTime variable statement.
-
year = IntVar(gui,value = sysTime.year)
month = IntVar(gui,value = sysTime.month)
day = IntVar(gui,value = sysTime.day)
hour = IntVar(gui,value = sysTime.hour)
minute = IntVar(gui,value = sysTime.minute)
second = IntVar(gui,value = sysTime.second)
We need to rewrite the timezone variable definition in the tkinter syntax too.
-
timezone = IntVar(gui,value = -7)
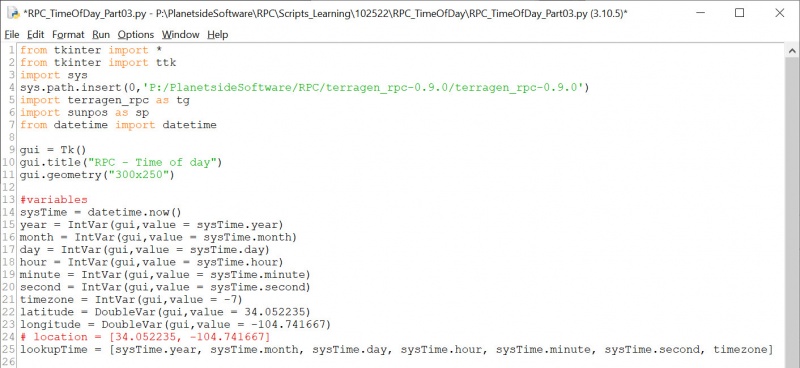
Just as with the date and time information, we need to split the location data into latitude and longitude, which use decimal precision and therefore require a different tkinter function, DoubleVar(). As these variables will replace the existing location variable, we can comment out that line of code so that Python ignores it.
The “#” at the beginning of the line of code defining the location variable, so Python ignores it.
-
# location = [34.052235, -104.741667]
latitude = DoubleVar(gui,value = 34.052235)
longitude = DoubleVar(gui,value = -104.741667)
Now that we’ve accounted for all the individual variables we can add them to the GUI. There are several ways to do this in Python, and for this tutorial we’ll use the grid method, which will allow us to align each variable with a corresponding text label to describe it.
Python refers to the GUI components, such as labels and buttons, as widgets. We’ll begin by creating a widget for each label. Each widget needs a unique name, so for the label widgets we’ll use “l_” followed by the name of the data it contains, for example “l_year”. The labels themselves will include information for the window it belongs on, the text to display, its position within the window, and how it is aligned. All the labels will belong to the “gui” window for now, and the text to be displayed is simply their name. The grid method uses rows and columns to position the label, and a “sticky” attribute to align the label.
The last widget allows us to insert a blank line that spans both columns.
-
l_year = Label(gui,text = 'Year').grid(row=0,column=0,sticky='w')
l_month = Label(gui,text = 'Month').grid(row=1, column=0,sticky='w')
l_day = Label(gui,text = 'Day').grid(row=2, column=0,sticky='w')
l_hour = Label(gui,text = 'Hour').grid(row=3, column=0,sticky='w')
l_minute = Label(gui,text = 'Minute').grid(row=4, column=0,sticky='w')
l_second = Label(gui,text = 'Second').grid(row=5, column=0,sticky='w')
l_timezone = Label(gui,text = 'Timezone').grid(row=6, column=0,sticky='w')
l_latitude = Label(gui,text='Latitude (N)').grid(row=7,column=0,sticky='w')
l_longitude = Label(gui,text='Longitude (W)').grid(row=8,column=0,sticky='w')
l_null = Label(gui,text=" ").grid(row=9,columnspan=2)
The code for the labels should look like this:
While the Label widget is used to display text and can not be changed by the user, the Entry widget accepts a starting value and user input. We’ll set each Entry’s “textvariable” to the corresponding initial value we assigned to the variables. Later, the user can change these values by simply entering a different value. To describe the widget for each Entry, we’ll use the prefix “e_” and the name of the Entry, for example “e_year”.
-
e_year = Entry(gui, textvariable = year,width=6).grid(row=0,column=2, sticky='e')
e_month = Entry(gui, textvariable = month,width=6).grid(row=1,column=2, sticky='e')
e_day = Entry(gui, textvariable = day,width=6).grid(row=2,column=2, sticky='e')
e_hour = Entry(gui, textvariable = hour,width=6).grid(row=3,column=2, sticky='e')
e_minute = Entry(gui, textvariable = minute,width=6).grid(row=4,column=2, sticky='e')
e_second = Entry(gui, textvariable = second,width=6).grid(row=5,column=2, sticky='e')
e_timezone = Entry(gui, textvariable = timezone,width=6).grid(row=6, column = 2, sticky='e')
e_latitude = Entry(gui, textvariable = latitude,width=16).grid(row=7, column =2)
e_longitude = Entry(gui, textvariable = longitude,width=16).grid (row=8,column =2)
The code for the Entry section should look like this:
Now that we can change the initial values for each parameter, we need a way to tell the script when to calculate our changes. For this we’ll use a button widget. Like the other widgets, the button can contain several bits of information, such as the text to display on the button. Most importantly it contains a command attribute, telling it what to do when the button has been clicked. In this example, the script will run the function “whenWhere”, which is yet to be defined.
-
b_ApplySun = Button(gui,text='Apply to Sun',bg='yellow',command=whenWhere).grid(row=11,column=2)
This is the code for the button section of the script.
To define the whenWhere() function, insert the code below into the script following the variables section and before the labels section. Note that it’s important to indent the lines of code after defining the function.
Using the get() function the “lookupTime” variable is updated with the current date and time values and the “location” variable is updated with the current latitude and longitude values. Note, some of these variables will be defined immediately after this step.
The next statement first passes three values to the sunpos module, then it accepts the returned data in the “results” variable as a list containing the heading and elevation.
Then the function “setTerragenSunHeadingAndElevation” is called, passing along the text “Sunlight 01” and the results variable containing the sun heading and elevation.
-
def whenWhere():
- lookupTime = [year.get(), month.get(), day.get(), hour.get(), minute.get(), second.get(),timezone.get()]
- location = [latitude.get(),longitude.get()]
- results = sp.sunpos(lookupTime,location,True)
- setTerragenSunHeadingAndElevation(“Sunlight 01”,results)
This is the code defining the whenWhere() function.
Since we’ve included the “lookupTime” variable within the whenWhere() function, and it is updated by the get() functions whenever the whenWhere() function is called, we no longer need it in the variables section.
Delete the line of code in the variables section that defines the “lookupTime” variable.
Also included in the whenWhere() function was the call to a function that performs the actual RPC commands and updates Terragen. The function will accept two arguments, one for the item to modify in Terragen which is the Sunlight 01 node, and the other, a list, containing the heading and elevation values. Let’s code that function directly beneath the previous function in the script.
Once you’ve completed coding the function below you can remove the previous lines of code created in Part 02 of this tutorial that did the same thing.
This function includes error checking commands such as “try”, “except”, and “raise”. Checking for potential errors or exceptions allows the program to handle them before they cause a problem, like crashing the application. For example, if a user entered text data in a numeric field, and the program expected numeric data, then an error would occur and the application might crash. With error handling, the application could display a message indicating the wrong type of data was entered and giving the user an opportunity to change the data. You can read more about the error checking command in the Terragen RPC documentation.
-
def setTerragenSunHeadingAndElevation(name,values):
- try:
- node = tg.node_by_path(name)
- try:
- node.set_param('heading',values[0])
- node.set_param('elevation',values[1])
- node.set_param('heading',values[0])
- except AttributeError as err:
- showError("Sunlight not in project. Refresh list.")
- showError("Sunlight not in project. Refresh list.")
- except ConnectionError as e:
- showError("Terragen RPC connection error: " + str(e))
- showError("Terragen RPC connection error: " + str(e))
- except TimeoutError as e:
- showError("Terragen RPC timeout error: " + str(e))
- showError("Terragen RPC timeout error: " + str(e))
- except tg.ReplyError as e:
- showError("Terragen RPC server reply error: " + str(e))
- showError("Terragen RPC server reply error: " + str(e))
- except tg.ApiError:
- showError("Terragen RPC API error")
- raise
- showError("Terragen RPC API error")
- node = tg.node_by_path(name)
Here is the code for the setTerragenSunHeadingAndElevation function.
The last step in this section is to create another function which displays any message passed to it by another part of the script. This function receives one input, the message to be displayed.
-
def showError(text):
- errMsg.set(text)
This is the code for the showError() function.
We need to create one last variable to store any messages set by the error checking processes. We can define the new variable at the end of the variables section of the script.
-
errMsg = StringVar()
Here is the variable section of the script.
Save and run the script. Try entering new values, especially for the hour of the day, and applying them to the Terragen sun.
(To be continued...)
A single object or device in the node network which generates or modifies data and may accept input data or create output data or both, depending on its function. Nodes usually have their own settings which control the data they create or how they modify data passing through them. Nodes are connected together in a network to perform work in a network-based user interface. In Terragen 2 nodes are connected together to describe a scene.
Graphical User Interface, a general term that refers to the interface of any program running in a modern graphical operating system and which does not operate exclusively from the commandline.
A parameter is an individual setting in a node parameter view which controls some aspect of the node.


