Difference between revisions of "Render"
| (4 intermediate revisions by 3 users not shown) | |||
| Line 1: | Line 1: | ||
| − | [[Image: | + | [[Image:Render-node-main-settings.png|Render]] |
| + | |||
| + | '''Node Type:''' Render | ||
| + | <br /><br /> | ||
| + | '''Node Description and Purpose'''<br /> | ||
| + | The Render node is one of the main nodes in Terragen 2. The Render node contains the settings used to produce final renders and is also used to start rendering animation sequences. The Render node works in concert with the Camera node to create a render of your scene from a specific perspective. | ||
| + | |||
| + | Basic controls include the Width and Height of your output image, the camera from which your scene will be rendered, overall scene Detail, and Antialiasing. Many additional controls for fine-tuning scene detail and quality are also provided, including Global Illumination (GI) settings, as well as Contrast and Gamma Correction functions. You can also render partial crops of your select cameras view using the Crop Region functions. Sequence/Output allows you to output a sequence of images for animation (only functional in Animation version). | ||
| + | |||
| + | When you start a new project in TG2 there are two render nodes created for you. One is called "Full Render" and the other is called "Quick Render". Both of these nodes are Render nodes. The difference between them is that "Full Render" has preset settings more suitable to a final render whereas "Quick Render" has lower quality presets suitable for a quick preview render. | ||
| + | <br /><br /> | ||
| + | '''Settings:''' | ||
| + | * '''Master:''' Check this to make the node the Master render node. The Master render node is the one which will be used to render projects loaded from the command line or a batch file. | ||
| + | * '''Image width:''' This param sets the width of the rendered image. | ||
| + | * '''Image height:''' This param sets the height of the rendered image. | ||
| + | * '''Lock aspect ratio:''' If this is checked then the image aspect ratio is locked. When you make changes to the image width or height the other param will be changed so that the aspect ratio of the image is maintained. | ||
| + | * '''Aspect ratio:''' You can change the aspect ratio for the image using the controls under the '''Lock aspect ratio''' param. Values greater than 1 will make the image wider and values less than 1 will make the image taller. | ||
| + | * '''Camera:''' This param sets the [[Camera]] node used for rendering the image. A Render node must have a camera assigned to it before it can render. | ||
| + | * '''Surfaces visible:''' If this is unchecked surfaces are not rendered. | ||
| + | * '''Atmosphere visible:''' If this is unchecked the atmosphere is not rendered. This might be useful if you are rendering orthographic images for texture overlays in another application, for example. | ||
| + | * '''Do shadows:''' Uncheck this to stop shadows rendering. | ||
| + | * '''Render Image:''' Clicking this button will start the render. | ||
| + | |||
| + | <u>Quality Tab</u> | ||
| + | * '''Detail:''' This setting controls the detail of the render. Although you can enter any value here the normal range is from 0 to 1. A setting of 0.8 is high quality. Increasing this value can lead to longer render times. | ||
| + | |||
| + | [[File:RenderDetail.gif]] | ||
| + | * '''Anti-aliasing:''' This controls the amount of anti-aliasing in the image. | ||
| + | |||
| + | [[File:RenderAntialiasing.gif]] | ||
| + | * '''Ray trace objects:''' If this is checked objects (plants for example) are rendered using raytracing. Generally speaking this leads to a higher quality image which renders more quickly. The disadvantage to using raytracing is that objects will not be rendered with displacement. If an object has displacement mapping in its textures the raytracer will convert this to bump mapping. | ||
| + | * '''Ray trace atmosphere:''' If this is checked the atmosphere is rendered using raytracing. This can give better looking results than the normal micropolygon renderer and might be faster. However it may be slower for some scenes. | ||
| + | * '''Edit sampling…:''' Clicking this button opens a window which lets you set advanced sampling parameters. | ||
| + | |||
| + | * '''GI relative detail:''' TBC | ||
| + | * '''GI sample quality:''' TBC | ||
| + | * '''GI blur radius:''' TBC | ||
| + | * '''Supersample prepass:''' TBC | ||
| + | * '''GI surface details:''' TBC | ||
| + | |||
| + | |||
| + | For more information on how Terragen renders a scene, review the [[Rendering Methods]] page. | ||
==Additional tabs for Render== | ==Additional tabs for Render== | ||
Revision as of 20:11, 21 September 2017
Node Type: Render
Node Description and Purpose
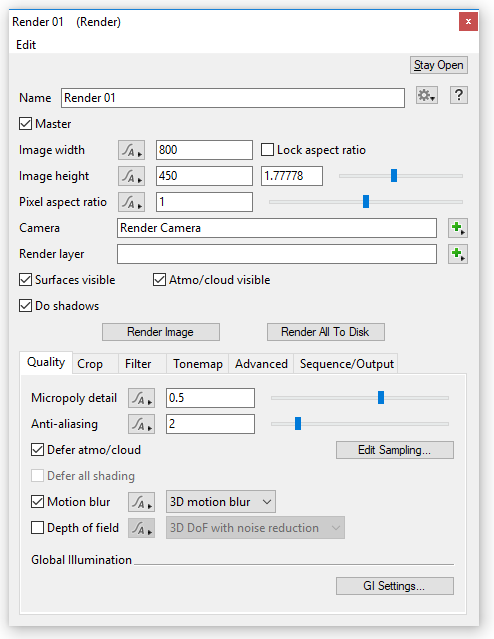
The Render node is one of the main nodes in Terragen 2. The Render node contains the settings used to produce final renders and is also used to start rendering animation sequences. The Render node works in concert with the Camera node to create a render of your scene from a specific perspective.
Basic controls include the Width and Height of your output image, the camera from which your scene will be rendered, overall scene Detail, and Antialiasing. Many additional controls for fine-tuning scene detail and quality are also provided, including Global Illumination (GI) settings, as well as Contrast and Gamma Correction functions. You can also render partial crops of your select cameras view using the Crop Region functions. Sequence/Output allows you to output a sequence of images for animation (only functional in Animation version).
When you start a new project in TG2 there are two render nodes created for you. One is called "Full Render" and the other is called "Quick Render". Both of these nodes are Render nodes. The difference between them is that "Full Render" has preset settings more suitable to a final render whereas "Quick Render" has lower quality presets suitable for a quick preview render.
Settings:
- Master: Check this to make the node the Master render node. The Master render node is the one which will be used to render projects loaded from the command line or a batch file.
- Image width: This param sets the width of the rendered image.
- Image height: This param sets the height of the rendered image.
- Lock aspect ratio: If this is checked then the image aspect ratio is locked. When you make changes to the image width or height the other param will be changed so that the aspect ratio of the image is maintained.
- Aspect ratio: You can change the aspect ratio for the image using the controls under the Lock aspect ratio param. Values greater than 1 will make the image wider and values less than 1 will make the image taller.
- Camera: This param sets the Camera node used for rendering the image. A Render node must have a camera assigned to it before it can render.
- Surfaces visible: If this is unchecked surfaces are not rendered.
- Atmosphere visible: If this is unchecked the atmosphere is not rendered. This might be useful if you are rendering orthographic images for texture overlays in another application, for example.
- Do shadows: Uncheck this to stop shadows rendering.
- Render Image: Clicking this button will start the render.
Quality Tab
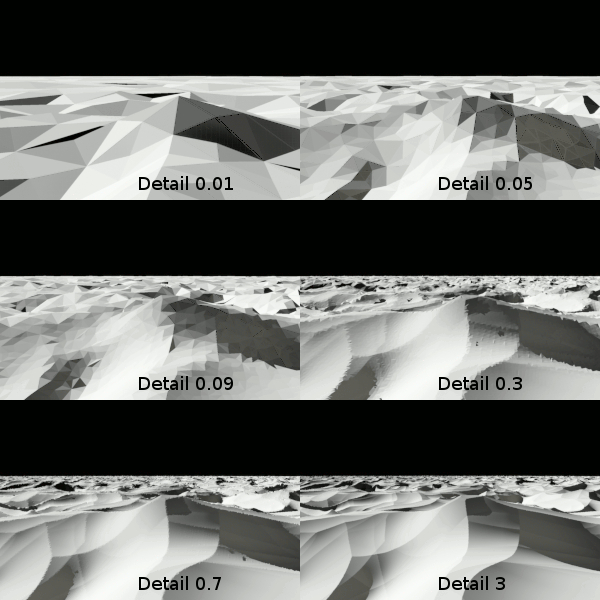
- Detail: This setting controls the detail of the render. Although you can enter any value here the normal range is from 0 to 1. A setting of 0.8 is high quality. Increasing this value can lead to longer render times.
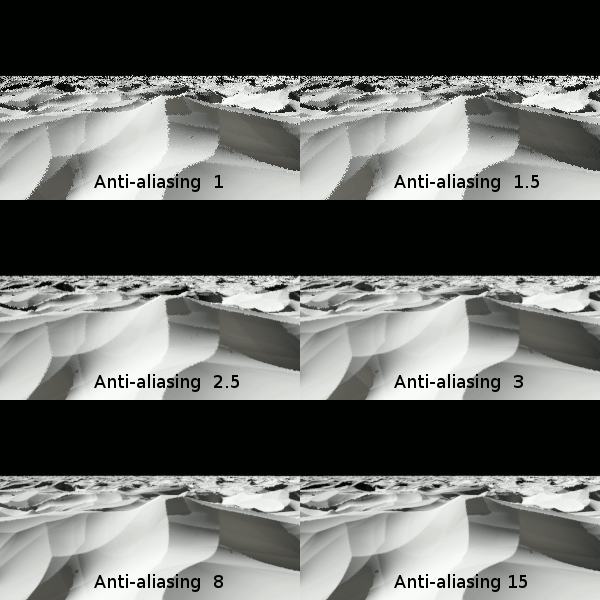
- Anti-aliasing: This controls the amount of anti-aliasing in the image.
- Ray trace objects: If this is checked objects (plants for example) are rendered using raytracing. Generally speaking this leads to a higher quality image which renders more quickly. The disadvantage to using raytracing is that objects will not be rendered with displacement. If an object has displacement mapping in its textures the raytracer will convert this to bump mapping.
- Ray trace atmosphere: If this is checked the atmosphere is rendered using raytracing. This can give better looking results than the normal micropolygon renderer and might be faster. However it may be slower for some scenes.
- Edit sampling…: Clicking this button opens a window which lets you set advanced sampling parameters.
- GI relative detail: TBC
- GI sample quality: TBC
- GI blur radius: TBC
- Supersample prepass: TBC
- GI surface details: TBC
For more information on how Terragen renders a scene, review the Rendering Methods page.
Additional tabs for Render[edit]
A single object or device in the node network which generates or modifies data and may accept input data or create output data or both, depending on its function. Nodes usually have their own settings which control the data they create or how they modify data passing through them. Nodes are connected together in a network to perform work in a network-based user interface. In Terragen 2 nodes are connected together to describe a scene.
Literally, to change the position of something. In graphics terminology to displace a surface is to modify its geometric (3D) structure using reference data of some kind. For example, a grayscale image might be taken as input, with black areas indicating no displacement of the surface, and white indicating maximum displacement. In Terragen 2 displacement is used to create all terrain by taking heightfield or procedural data as input and using it to displace the normally flat sphere of the planet.
A sample refers to a value or set of values at a point in time and/or space. The defining point of a sample is that it is a chosen value out of a continuous signal. In Terragen 2 it is usually a mathematical (procedural) function that is being sampled.


