Navigation Panel
Introduction
The navigation panel can be used to easily move around a scene and manipulate the camera. While its main use is in the 3D Preview, it can also be used with shader and heightfield previews.

Navigation Panel: Integrated into the 3D Preview and in a standalone floating window
There are two ways the navigation panel can be accessed. The first is to use the standalone TG2 Navigation floating window. This window can be opened from the View menu, by selecting the Navigation Window menu item. When using the navigation window the navigation controls effect the last focused preview. To control any preview in the application, first click on it to focus it and then use the navigation window controls to manipulate the camera.
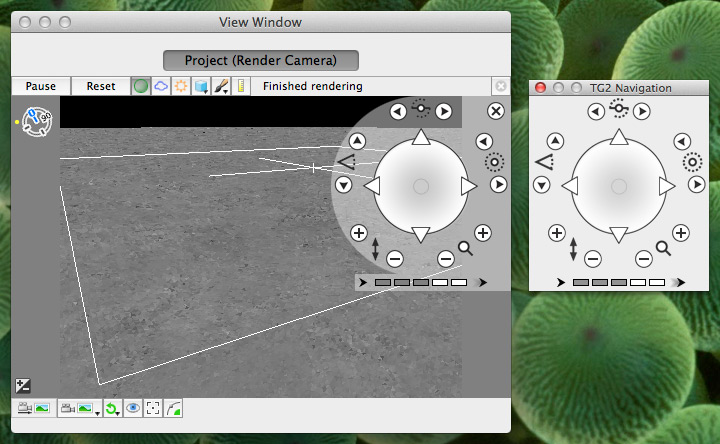
The second way is to use the navigation panel integrated into previews. You can toggle the display of the navigation panel on and off. To show the controls you can click the navigation panel icon in the top right of the preview (shown below). To hide them again you click the close button at the top right of navigation panel. When you use the navigation panel in a preview it only effects that preview, it doesn't effect others as you can when using the standalone TG2 Navigation window.
Using the Navigation Panel
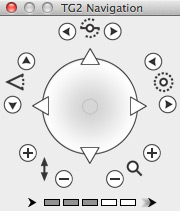
This is the navigation panel in its standalone floating window:
In the centre is the movement ring, with the triangular forwards, backwards, left and right movement buttons around its edge. There are a number of controls arranged in a circle around the movement ring. Starting from the top and moving clockwise, these are the bank, rotate, zoom, altitude and tilt controls, respectively. At the bottom of the panel is the speed bar, which you can use to control how fast you move.
The movement ring
The movement ring allows you to move in several ways. You can click the triangular movement buttons around the edge to move in that particular direction. The movement buttons at the top and bottom move you forwards and backwards. You might think they were up and down controls, but imagine you were looking down on the movement ring from above.
You can also click, or click and drag, in the movement ring. The place you click in the ring determines both the direction you move in and the speed you will move. Movement will continue until you release the mouse button. Imagine the ring is a clock face. If you click around the 1 o'clock position you will move forwards and a little to the right. If you clicked at the 8 o'clock position you will move to the left and slightly backwards.
The speed you will move is controlled by how close to the edge of the ring you click. The speed increases from the middle of the ring to the edge of ring. The edge of the ring is the fastest speed. There is an area in the centre of the ring, inside the small grey circle, where the is no movement at all. If you click in the small grey circle you will not start to move until you drag the mouse out of the that circle.
While you have the mouse held down in the ring you can drag it around to change the direction and speed of the movement. You can click in the small grey circle and drag towards the edge of the ring to smoothly accelerate from stopped to moving in the direction you've dragged. You can drag back toward the centre to slow down. You can click in the ring to start moving immediately, and drag the mouse to change direction. When you drag outside the ring you will continue moving in the direction and the speed you were going when the mouse left the circle.
Outer ring controls
As mentioned above, the controls arranged in a circle around the movement ring control the bank, rotate, zoom, altitude and tilt, starting at the top and moving clockwise. These are the icons for the controls:
Here is a description of each control:
- Bank
Click the arrows to bank left and right respectively. You can click the Bank icon to reset the bank value to 0, which is flat and level. -
Rotate
Click the arrows to rotate, or turn, left and right respectively. Rotation is the same as changing the Rotation heading value in the Camera node. You can click the Rotate icon to reset the heading value to 0. -
Zoom
Click the plus button to zoom in, or the minus button to zoom out. Clicking the Zoom icon will reset the zoom value to the camera node defaults, for example 60 if you are using a perspective camera with horizontal FOV. -
Altitude
Clicking the plus button will increase the altitude or elevation, and the minus button will decrease it. This is the same as changing the Y position value in the Camera node. Clicking the icon will reset the altitude value to 1000. -
Tilt
Click the arrows to tilt up and down respectively. This is the same as changing the Rotation pitch value in the Camera node. Click the Tilt icon will reset the tilt to 0, which is flat and level.
The speed bar
You can use the speed bar to control the speed of movement. There are 5 speeds, shown by the 5 boxes making up the bar, which increase from slowest to fastest as you move to the right. Click in the boxes to change the speed. Clicking in the box on the left is the slowest and will highlight one box. Clicking in the box on the right is the fastest, and highlights all 5 boxes.
Toggling the navigation panel display
If you refer to the first image above you will see that the navigation panel has an extra control in the top right when it is being used in a preview. This is the close button, and clicking it will hide the navigation panel. When it's hidden you will see the navigation panel toggle button (see image above) in the top right of the review. Clicking that will show the panel again. The panel is always hidden when a preview is first opened.
What if I don't want to use the Navigation Panel in Previews?
If you would prefer not to use the navigation panel in previews for some reason, you can choose to disable it in the Navigation preferences panel. When it is disabled you won't see the toggle button in previews, and of course you won't be able to display the full navigation panel either. You can still open the standalone TG2 Navigation window from the View menu.
Advanced Controls
Advanced users may want finer control over positioning when using the navigation panel. If so, you can set custom step sizes for both linear and angular movement in the Navigation preferences panel. See its documentation for more information. These custom step sizes come into effect when you set the speed bar to the slowest setting, with just one box filled. If you like, you can set it to move fractions of a millimetre at a time.
A shader is a program or set of instructions used in 3D computer graphics to determine the final surface properties of an object or image. This can include arbitrarily complex descriptions of light absorption and diffusion, texture mapping, reflection and refraction, shadowing, surface displacement and post-processing effects. In Terragen 2 shaders are used to construct and modify almost every element of a scene.
A heightmap or heightfield is an array of height values, usually in a grid which describe the height at specific points in a defined area. Heightfields are used to represent real-world and virtual terrain in a specific, easily converted format. Most heightfields can be represented as simple image data in grayscale, with black being minimum height and white being maximum height.
A single object or device in the node network which generates or modifies data and may accept input data or create output data or both, depending on its function. Nodes usually have their own settings which control the data they create or how they modify data passing through them. Nodes are connected together in a network to perform work in a network-based user interface. In Terragen 2 nodes are connected together to describe a scene.

